UTorrent
Contents
Notice of allowed uTorrent version
See the Client whitelist for supported versions
Summary
µTorrent is a very small and fast BitTorrent client. It needs very little memory and can run on almost any computer, fast or slow. It is recommended for users that want enough control over their torrents but also want to use their computer for other things simultaneously.
µTorrent (pronounced as 'micro-torrent') can be downloaded at http://www.utorrent.com.
This Guide is based on µTorrent version 1.7.x.
Updated Sections:
- Summary
- How to Change your Port
- How To Setup Auto-Downloading via RSS
To Do
- How To Create a Torrent
- How To Setup a TMB Search Feed
- At A Glance...
How to Change your port
You will need to do this if you receive the following error message: "Rejected by tracker - Port xxxx is blacklisted" when trying to download.
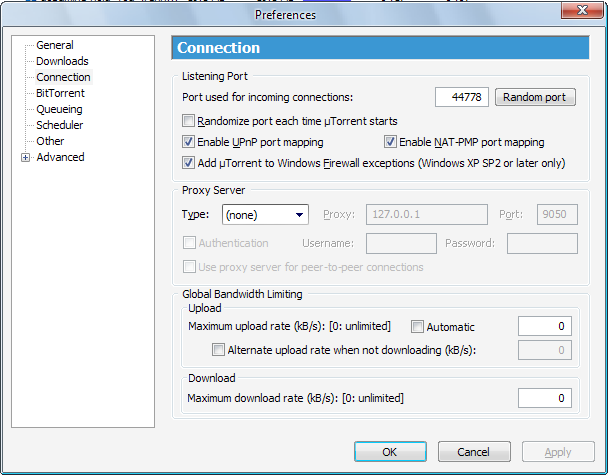
Go to Options->Preferences (or hit Ctrl+P). This will open the Preferences window. Select Connection from the list on the left. You will see the following window:
Port Used For Incoming Connections: This is what you need to change. it can be anything other than the ports from 6881 to 6889, and its up to you what you choose. However, it is recommended to choose something between 50000 and 60000. These ports are not commonly used for anything else. Refrain from using a number below 1024. These are known as service ports and are reserved for specific programs/tasks. You can use the Random Port button to automatically generate a random port number
Randomize port each time µTorrent starts: This option can be useful if your ISP monitors your Internet traffic or attempts to Throttle bandwidth used by P2P (Peer to Peer) applications (which BitTorrent is). Note: If you have this option selected and are doing manual port forwarding, you will need to change that forwarding every time you start µTorrent in order to make sure that you are connectable.
Enable UPnP port mapping: This should be ticked. This may save you having to do any manual port forwarding if you are behind a router and your router supports UPnP.
Enable NAT-PMP port mapping: This is essentially the same as the previous option and also should be ticked. NAT-PMP stands for Network Address Translation Port Mapping Protocol and is simply a different method of achieving the same end result. Chances are that, between UPnP and NAT-PMP, µTorrent will be able to automatically forward the correct port to your computer.
Add uTorrent to Windows Firewall exceptions (Windows XP SP2 or later): This should be ticked. You don't want a firewall blocking your downloads!
You can ignore the other options for now. Once thats been done, click OK to exit the Preferences window. Next, we're going to test your connection to make sure your port is properly forwarded.
Go to Options -> Speed Guide (Ctrl+G) and click the 'Test if port is forwarded correctly' button. It will run a little test and tell you if it is. This will open a browser window to show you the results. If you receive an error, you may have to manually forward ports from your router to your computer. This can happen on school/university networks. You can also do a quick visual check to see if everything is working correctly by looking at the Network Status light at the bottom of the uTorrent window. Please note that this method is not 100% accurate, while the previous test method is.
Red: Something is wrong. Run the connection test. (Means you are not 'connectable') (Usually caused by unforwarded ports)
Yellow: At the moment there are no imcoming connections. (If this never turns green, run the connection test to check if it's OK.)
Green: You have successfully received an incoming connection, which means that your ports are forwarded and that everything is working like it should. (You are connectable). Hooray!
How to Create a Torrent
1. Put the file you want to torrent into a folder. Make sure you name all files and folders neatly and tidy up the file's tags with a program such as mp3tag --> [1]
2. Before attempting to create the torrent, search themixingbowl.org very thoroughly to check that the mix or show hasn't already been uploaded - use the search function, making sure to tick the 'including dead torrents' box. Duplicates are only allowed where every attempt has been made to find a seeder for a dead torrent but none have appeared after a reasonable amount of time.
3. IMPORTANT - You must make sure this folder includes the mixing bowl .nfo, found here --> [2] - Click File --> Save As then save the .nfo file in the folder that you are making into a torrent. Also try to include in the folder :-
  - A tracklist, written in Notepad or Word.
  - Any .cue files that the file may have.
  - Any other relevant information. The more detail about the file's source you can
    include, the better.
4. Open µTorrent
5. Click File --> Create New Torrent
6. Click 'Add Directory' --> find the folder you're torrenting and select it.
7. From the Upload screen, cut and paste your personal announce url into the Trackers field in uTorrent.
8. In 'Comments', put this --> "www.themixingbowl.org"
9. Check 'Private Torrent'
10. Click 'Create and Save As'
11. Once it's torrented, save the .torrent file to your hard drive
12. On themixingbowl.org, click 'Upload' in the 'Torrents' menu
13. Fill in all the details very carefully
14. At the bottom of the page is the "Torrent Files Only" section. you need to click the "BROWSE" button and navigate to the area on your hard drive where you saved the torrent file you just created in STEP 11.
15. Once that has been done and you have filled in all the info Click 'Upload torrent'
16. Bingo!
How to Setup auto-downloading via RSS
Install
The first thing to note is you don't need to download any external program - µTorrent has RSS built in!
Configuration
Click on the RSS icon (2nd rightmost button) or go Options > RSS Downloader (Ctrl+R).
Now you can add 'feeds', a feed is simply an address that will tell µTorrent where to find torrent files. The basic format for the TMB RSS feed is:
https://themixingbowl.org/rss.xml OR
https://themixingbowl.org/rss.xml
See the FAQ entry on RSS feeds for more details.
If you use an old version of uTorrent, to name the feed (to keep it organized, for example) you'll need to add 'Name|' before the feed's URL, so that it looks something like this:
TheMixingBowl|https://themixingbowl.org/rss.xml
Do not add spaces before or after the '|'.
Setting Up Filters
I feel that these filters are redundant, now that you can customize the feed to only a certain category/genre, however I have included them here as a reference.
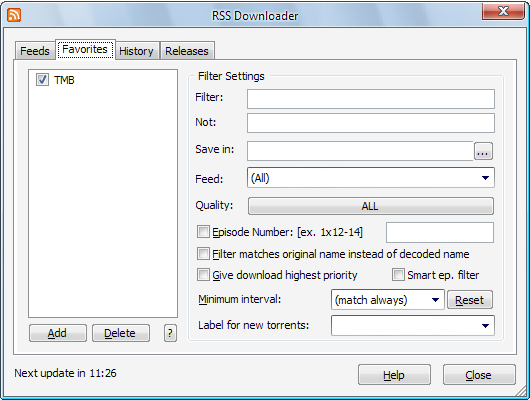
In the same window as before, click the Favourites tab. This window will appear:
Then, name the filter whatever you like. After that, fill in the following values.
Filter: What you're looking for. Do not enter plain text here. You'll need to use the following wildcards to get a match:
- * means any number of characters.
- ? means any 1 character.
You can also use the '|' (pipe) character to represent 'or'. For example, say I want to search our example feed (from above) for Essential Mixes done by Deep Dish or Pendulum. I would enter the following into the Filter box:
*Deep?Dish*|*Pendulum*
Not: This is for entering values so that µTorrent will ignore a torrent. Probably more useful on other sites with proper scene release names, but I'll still mention it here. Works identically to the Filter box.
Save in: Designate the folder that you want the files in the torrent to download to. This box is required unless you use µTorrent's 'Put new downloads in:' option
Feed: Whether or not to apply the filter you have created to all of the feeds you have µTorrent reading, or only a specific one. Select the feed you created earlier.
Everything else: You can ignore it. They are more useful on feeds that have a larger variety of content.
After you've finished everything, simply close the window. Changes are automatically saved.
PS The History tab shows you what µTorrent has downloaded in the past (subject to the filters you've created) and the Releases tab shows the entire feed.
PPS Also make sure that Options->Preferences->Downloads->Don't Start the Download Automatically is not ticked. If it is, the torrent will not automatically start.
How to setup a TMB search feed
This will allow you to search all of TMB's torrents from uTorrent's interface!
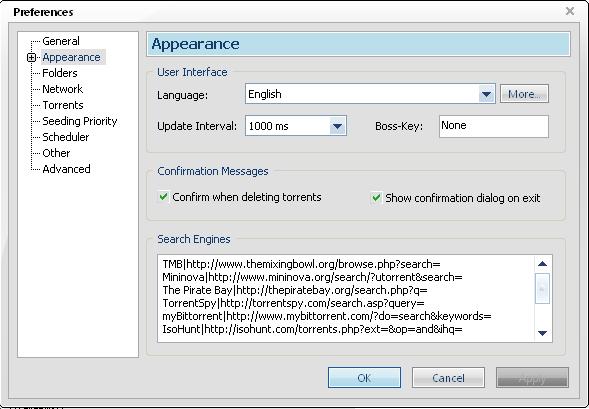
Options > preferences > apperance
(if using 1.6.1 its in = Options > preferences > Advanced > User Interface)
search 'strings' work the the following way : 'your name for search/site' | 'the search url'
paste this into the box to have a search named TMB:
TMB|https://themixingbowl.org/torrent/?search=%s
now go click and select it in the top corner!


