Difference between revisions of "Azureus"
| Line 1: | Line 1: | ||
| − | |||
| − | |||
| − | |||
| − | |||
==How to create a torrent== | ==How to create a torrent== | ||
Revision as of 15:02, 15 November 2006
How to create a torrent
1. Put the file you want to torrent into a folder. Make sure you name all files and folders neatly and tidy up the file's tags with a program such as mp3tag --> [1]
2. Before attempting to create the torrent, search themixingbowl.org very thoroughly to check that the mix or show hasn't already been uploaded - use the search function, making sure to tick the 'including dead torrents' box. Duplicates are only allowed where every attempt has been made to find a seeder for a dead torrent but none have appeared after a reasonable amount of time.
3. IMPORTANT - You must make sure this folder includes the mixing bowl .nfo, found here --> [2] - Click File --> Save As then save the .nfo file in the folder that you are making into a torrent. Also try to include in the folder :-
  - A tracklist, written in Notepad or Word.
  - Any .cue files that the file may have.
  - Any other relevant information. The more detail about the file's source you can include, the better.
4. Open Azureus
5. Click File --> New Torrent...
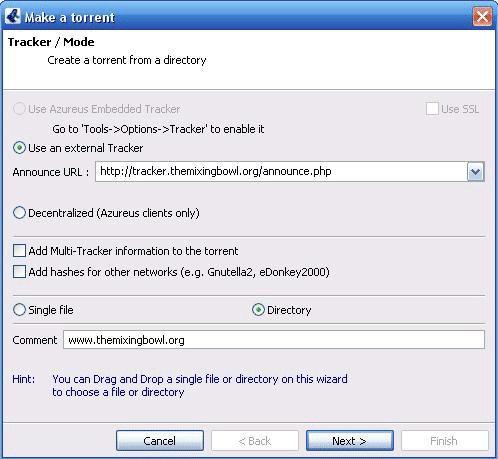
6. Enter the following in the 'Announce URL' box: "http://tracker.themixingbowl.org/announce.php" (copy and paste link)
7. Click --> Directory
8. Enter the following in the 'Announce URL' box: "www.themixingbowl.org". Your 'Make a Torrent' window should now match the following image:
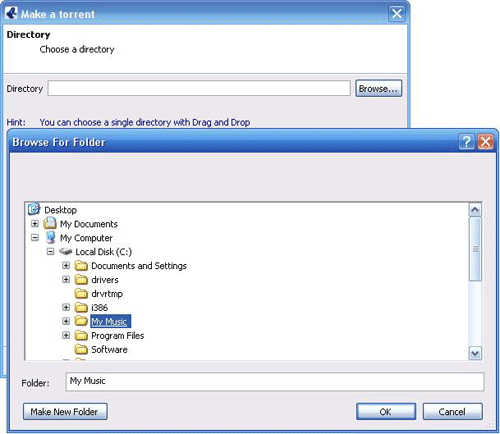
9. On the next screen browse to the location of the folder created in Step 1
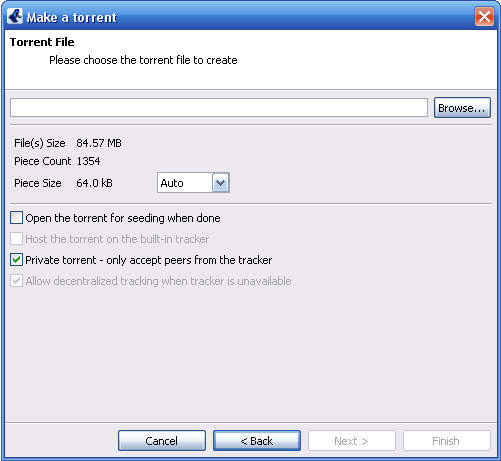
10. This screen asks for the name of the torrent to be created, leave it the same as the folder you have created. It also asks for piece size, leave this as auto. Select the "private torrent - only except peers from tracker" this will keep your ratio up to date with the tracker. Pressing finish creates the torrent.
Well done you're half way there!
11. Next you need to go to the upload page
12. Fill in all the details very carefully
13. Click 'Do it!'
14. Go to your TMB profile page, find the 'Last 10 uploaded' window and download the correct .torrent file opening it up in Azureus. In the 'Location to save data:' window point it to the location of the folder created in Step 1
15. Azureus should then check that the folder is there and complete, then after a few seconds it will drop to the bottom window and begin seeding.
16. Sit back, watch everyone uploading from you and pat yourself on the back for a job well done.
How do I set up Azureus to auto download torrents via RSS feed?
I've compiled this little walkthrough from a few of my other posts for anybody interested in using the RSSFeed Scanner plugin with Azureus to automate the downloading of certain types of torrents. I use this to grab every Breezeblock that is uploaded, but you could equally well use it to grab everthing that's upped by a particular artist.
Installation:-
  - Install plugin
  - Grab the RSSFeed Scanner plugin from here
  - Exit Azureus if it's running
  - Make a new folder in your Azureus plugins folder (C:\program files\azureus\plugins is the usual location) and call it RSSFeed
  - Extract the zip file you downloaded into the new folder
  - Restart Azureus, it should autodetect the new plugin, although I can't remember if it actually tells you it has
Configuration:-
  - Select RSSFeed from the Plugins menu at the top
  - A new tab should open in Azureus with the title RSSFeed Scanner, select the options sub-tab
  - Top left where it says RSS Feed URLs: click the + sign
  - The right side should now say Options: and show a few text boxes and tick boxes
  - Give the feed a name, e.g. Mixing Bowl...
  - In the URL box type "http://themixingbowl.org/rss.php?user=username&pass=password" without the quotes and remembering to replace username and password with your own
  - You can set a default download location using the Directory box, but it's not compulsory
  - Leave everything else as it is, but make sure you tick the Active: box so the feed is enabled
  - Go back to the Status sub-tab, it should now be showing "Mixing Bowl" under Feed/Title.  You may need to right click and Refresh Feed to see the items
What you need to do next is setup filters that tell the plugin what you want to download.
Setting Up Filters:-
- On the Options sub-tab of the RSSFeed Scanner tab, click on the + next to the Filters section, bottom left
That will open up a whole load of text boxes on the right half of your screen for you to input the details of your new filter. As an example I'll use the filter I set up to grab all the Breezeblocks that come up on here :
  - Name : Breezeblocks
  - Directory : Designate the folder that you want the torrents to download to
  - Filter : breeze (this is the important bit - the plugin will search all the torrents for any occurance of "breeze")
  - Options : Make sure Filter searches title and Filter searches link are both ticked
  - Feed : Mixing Bowl (select the feed you have just created)
  - Type : Not important for this situation, leave it on None
  - Active : Make sure Enabled is selected!
  - Mode : Pass!
Click on the save button and you're done. You should now have a filter named Breezeblocks showing in the list on the left side with a tick in the box next to it. If so, you're up and running and can now leave it to get on with downloading anything that is uploaded that matches the filter.


