Digitising cassette tapes
From TMB Wiki
What You Need
- A Hi-Fi separates cassette tape deck (a portable cassette player walkman will work, but with reduced audio quality)
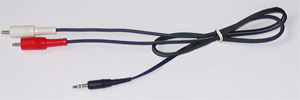
- 3.5mm stereo to two phono plugs cable lead: approx £5 in the UK (if you have a really good soundcard it will have two phono line-in sockets: so just get a standard interconnect cable)
- A soundcard that accepts line-in: most motherboards these days have this on board
- To clean the tape heads and other parts use pure denatured alcohol (recommended) / isopropyl alcohol / good quality rubbing alcohol / surgical spirit or possibly a A cassette tape cleaner and lint-free swabs / cotton wool buds / q-tips. This will help to capture a better sound since the cassette tapes will likely be old and dirty.
- For more information and help check out this Instructables | How To Clean a Cassette Recorder guide
- A precision Philips demagnetised screwdriver to adjust the azimuth.
- An audio capturing/editing software application. I personally use Audacity as it's very easy to use, is free and open source, and has many plug-ins available (LADSPA / Nyquist / VST Plug-Ins). There are other apps that will do the same job
- A lossless audio encoder like FLAC or WavPack: this is so that once you've got the audio in the state you're happy with, you can encode it to a lossless format for archival purposes. You can then transcode it to lossy formats like MP3 etc for sharing
- A lossy audio encoder like LAME for MP3
What To Do
Capturing/Recording
- Check the pinch rollers are ok. I had to replace mine in 2015 as the rubber had started to degrade after 20 years and this meant it was "chewing" up tapes!
- Fast forward and rewind the cassette tape before playing it. This will tighten up the tape inside and help prevent it being 'chewed-up' by the tape deck.
- Connect the left & right plugs of the 3.5mm stereo to two phono plugs cable lead to the cassette tape deck and the single 3.5mm stereo plug to the line-in on the soundcard.
- Ensure the sound recording capabilities on your computer are enabled: (for windows) Control Panel > Hardware and Sound > Sound > Manage audio devices > Audio tab > Recording > Line In - Properties > Device usage: enable.
- Sample rate should be set to 44100Hz. Sample format should be set to 16-bit. Given the relative low quality of the analogue audio in the cassette tape, you'll be very unlikely to notice any improvement in sound quality with higher settings; CD is 44100Hz!
- The only time I'd recommend higher settings, such as 48000Hz/96000Hz and 24-bit, is when you have a very good soundcard and a good quality recorded tape and / or you will be doing lots of manipulating of the recording. Each transform, such as Noise Reduction, will produce quantization errors. Ideally the editing program dithers the transform (if working in 16-bit), which means more noise added. However, due to the high intrinsic noise of recordings from cassettes, this is unlikely to be distinguishable for the 'normal' amount of editing (see 9. & 10. below)
- Play the tape and adjust the azimuth screw using the precision Philips head screwdriver. See here for more information on what the azimuth is and how to adjust it. Very basically, there's a small screw on the left of the play head if the heads are on the bottom going up as you push play. If the play head is on the Top (going down as you push play) then the screw you want to turn is on the right.
- Using small and slow turns of the screw in both directions, try to find out where the screw adjustment results in the clearest sound.
- It's often best to find some audio with signing and lots of treble to really help identify the best position the screw needs to be in. Even a section with hiss can help as the clearer the hiss the better.
- Make sure you adjust the azimuth on both sides of the tape before recording.
- Only play tapes in one direction and do not use auto-reverse. This causes the head to change direction to allow playback in reverse, BUT it will slightly put it out of alignment and the resulting audio quality will be reduced. Solve this by adjusting the azimuth if the cassette tape was recorded using the auto-reverse functionality originally (see above).
- The azimuth adjustment is vitally important. The sound quality gained from this simple and often minor adjustment is huge.
- Using small and slow turns of the screw in both directions, try to find out where the screw adjustment results in the clearest sound.
- Play the tape again and start recording: this is a test! because you'll need to fast forward to random parts of the tape to try and find the loudest section: use that as your basis to adjust the line in recording volume so that there is no clipping. Ideally, you want to capture the audio at -5db. In Audacity you can view the sound wave in db format, so that will show you what db level you are recording at. It's always better to record at a slightly lower volume and then increase it after you've captured the audio. And don't get worried about it looking like it's at a low volume; it will be fine.
- After you've sorted the line-in recording volume level, you can start to record the audio.
- Once the recording process has finished, you might want to go through the audio to edit out any parts that you do not require. Namely the silence at the start and the end of the tape. If suitable, you can fade in and fade out now whilst you have the audio in this 'raw' format.
- You might also like to remove any 'hiss' or reduce certain noises (tape hum). Audacity has a 'Noise Removal' tool that is quite good. Be warned though: it will often result in a slight loss of high-end audio that might make it sound worse than the original. I don't normally perform this action unless there is a lot of hiss. Adobe Audition has a very good Noise Removal tool, but the program is also quite expensive.
- Once you've completed manipulating the audio, you could process the file with WaveGain. This is based upon the Replaygain standard and will effectively apply gain (volume) adjustments directly by adjusting the scaling of the samples. Unlike Replaygain, this is not a lossless process and cannot be reversed. It means the files are adjusted to -89db, which often results in a smaller file size too, as most people tend to record at too high a level. If all music was the same relative volume, we'd never need to change the volume control on our equipment if we always wanted the same absolute volume.
- If you have recorded the audio close to -89dB (i.e. the volume of the audio is not too far away from this level), then it may be better leaving it and not running WaveGain on it, instead using Replaygain on the final lossless files.
Encoding
- Given the effort and time taken to capture and manipulate the audio, I'd highly recommend that the final file is encoded to a lossless format such as FLAC or WavPack. This means you are left with a perfect archival backup of the audio captured: it's smaller in file size than a wav file, and you are free to convert (transcode) to any of the lossy Audio Formats you like whenever you like, such as AAC, Opus, MP3 or Ogg Vorbis etc etc.
- For uploading at themixingbowl.org I'd recommend the file is encoded to MP3 using the LAME encoder or to M4A (AAC).
- And don't forget to tag the file. If you can add as much relevant info into the tags and in a logical way, then the downloaders will not need to change the tagging and thus can keep seeding for longer (ever!)
A Final Word
If you really value your cassette tapes recordings then purchasing a high-end audio editor may yield better results than free audio applications. You can also search the internet for perhaps a better, and maybe more detailed, technical information about cassette tape audio capturing. This is just how jaybeee does it with pleasing results from fairly cheap equipment and free software.