Preparing releases from internet-based broadcasts
The basic 'howto' section addresses all necessary things for uploading stream rips (MP3 or AAC+). That section is kept as simple and straightforward as possible. More advanced uploaders will also like the advanced optimizations section further below.
Contents
STREAM RIPS - A BASIC 'HOW TO'
Wanna rip internet radio streams? Basic things you need to check first...
- You want to upload self-recorded DJ sets from Internet Radio broadcasts to the TMB tracker?? Check the list of allowed radio stations and DJs first! This is necessary to prevent you from uploading 'bedroom DJs' from 'bedroom internet radios' to the tracker. Note that this will be enforced by admin!
- Then check the allowed quality for each radio station!. This is necessary to avoid the upload of low quality 'low bitrate' sets to the tracker. Do not record sets in lower quality although a higher quality stream would be available.
- But also do not record, encode and then upload DJ sets in 'higher' quality. Such a 'higher' quality (i.e. recording a set broadcasted in 192kbps and then transcoding it to 256kbps or 320kbps) isn't possible, you only 'nuked' the broadcast and transcoded a high quality file into low quality crap - despite having a much higher bitrate than before! Do never ever use so-called 'MP3-recorders' or other WAV to MP3 programs, these are just evil for recording from Internet Radios!
The only way to properly record (rip) from Internet Radios are so called digital stream rips. Here you get the basic HOWTO on how to do proper digital stream rips without any quality loss!
Installing and configuring Winamp/Streamripper
For proper internet recordings (digital stream rips) you will need only two programs:
Follow the two links to get the two programs, then install them. Configure Winamp to always start the streamripper plugin together with the main Winamp program.
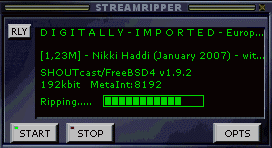
The black, small main window of the streamripper plugin is shown below. It shows the streamripper working....
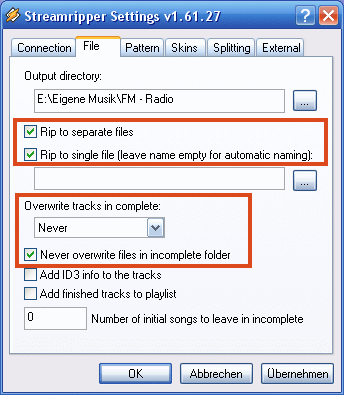
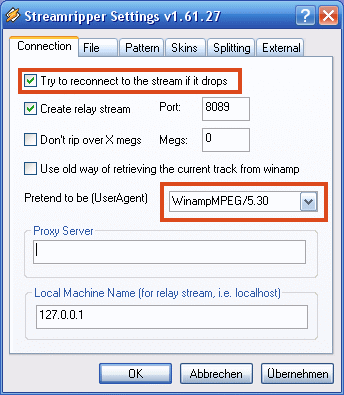
Also shown are some streamripper configuration options (behind the 'OPTS' button) in the other two images. Important are especially the coloured rectangles and their content. Use them exactly as displayed and your chances to get a proper streamrip are very high!
- Note that streamripper with these options will save two (!) MP3 files for each broadcast to disk so for a 2h broadcast at 192kbps you will need disk space of at least 350MB. The reason why is outlined later in the section for advanced uploaders and is not important at the moment. One of the files serves as backup in case something goes wrong.
- A proper user agent is also quite important: some radio stations are very picky among the allowed players and rippers on your side - always use the string "WinampMPEG/X.XX" with X.XX being the version number of the main Winamp program (for example use 'WinampMPEG/5.30' for 'Winamp 5.3' or 'WinampMPEG/5.24' for 'Winamp 5.24'.
Special note: if you want to listen while recording (most will), do not change the default 127.0.0.1 in the Local Machine Name field. Check the box Create Relay stream and provide a default port (in the above example it is the port 8089).
That's it more or less, other Winamp or Streamripper configuration options are not really important. Now you are set to rip your first internet radio stream. You can rip and record in almost any streaming format that Winamp can pull from the internet and play (MP3, OGG, AAC+). For streamripper there is no difference, it saves all the files of different formats to disk without problems.
Recording MP3 and AAC+ streams from Internet Radios to disk
Here is the step by step guide to record Internet Radios. Always follow the guidelines, some Internet Radios do not like deviations from the schemes provided below and will hurt you with stalling streams and lots of skips. The following applies to all streaming formats, let it be streaming in MP3, AAC or OGG:
- Go to the homepage of the internet radio and load the playlists directly linked on that page (*.pls or *.m3u) into Winamp. Do not use the links from shoutcast.com or similar listing sites, these are in part hi-jacked and faked (for example by pretending to be running at higher bitrates than possible).
- Some playlists come with different streaming URL entries in the Winamp playlist window. Check them and try to find the URL entry with the highest possible quality (192kbps, for example) and the least number of skips or bufferings. The number of skips should be zero, if possible!
- Make a final check on the URL entry that was the best so far (without skips or bufferings). Listen to it for five minutes. No skips should be heard. Then stop the stream!
- Go to the main streamripper window. It should display your selected stream URL. Press the "start" button. Streamripper starts to rip the stream and saves it to your disk. Streamripper does not play the stream so you do not hear anything.
- Create a local relay stream so that you can listen to your own stream rip. Do it by clicking on the "RLY" button in the main streamripper window. In the main Winamp playlist window a link appears with the format 127.0.0.1:8089 (given the above mentioned streamripper options). Double-click on the entry and you can listen to your own stream.
- Press the 'stop' button in the main streamripper window after recording the whole show you wanted to record / rip.
- Now you will need to find the ripped files. They are saved in directories with the name of the show or stream (main copies). See the image below. However, do never use files remaining in the "incomplete" directories, these files are always broken and do not provide the full show you intended to rip. In case of problems during the broadcast you won't find files outside the "incomplete" directories at all. You "lost" the broadcast in this case.

Post-processing AAC+ streams (necessary, but easy!)
Yep, post-processing AAC+ streams is necessary while MP3 streams do not need any further postprocessing and can be uploaded as-is. This special treatment for AAC+ files is necessary as the broadcasted AAC+ streams are present in 'raw, headerless format and this raw format can be played only by Winamp and a few selected software players without problems. The general solution for getting AAC+ streams to work with any player is to place it in an MP4 container. This is very easily done but you need some pieces of software in one directory.
- Installing the necessary programs
- You will need the latest versions of the following programs and libraries, install or copy them all into the main Yamb program directory. Follow the installation order as provided below:
- 'latest' Yamb 1.6+ with Installer
- 'latest' MP4Box.exe, copy it across the original MP4Box.exe in the Yamb directory.
- 'latest' MediaInfo.dll 0.7.x (>0.7.4.2), copy it in the Yamb directory.
- Hip.dll, copy only the Hip.dll in the BeSweet package in the Yamb directory (and nothing else)!
- Configuring Yamb/MP4Box
- After the installation you will have to start and to configure Yamb, do it exactly in the way as shown below. In the Options tab, add the complete path to the now updated MP4Box.exe. Also, do not forget to check a few of the boxes.
That's it.
- Muxing AAC+ streams into an MP4 container
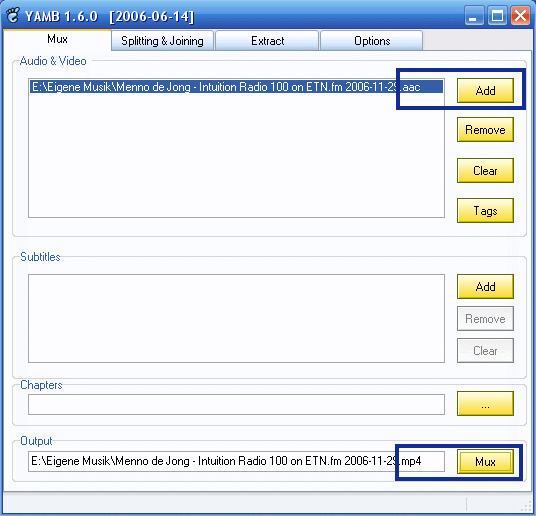
- The final step is the most simple one. See the image below. Simply press the Add button and add the relevant AAC file to the Audio & Video box. Do NOT change anything in the dialog box that pops up and quit it by pressing Okay! Only one AAC file at a time, please. Then finally and simply press the MUX button. That's it. You will find an MP4 file in the same directory as the AAC file. Use the MP4 file from now on! You can safely delete the original AAC file....
That's it (again).
Final steps for preparing MP3 and MP4 releases
Now you can check and finalize the saved main file(s) - check whether or not the recorded show properly starts at the beginning of the ripped file, check whether or not the end of the file is in sync with the end of the show. We assume that the answer is yes (if the stream and the metadata are in sync - that is usually the case). If you want change the ID3 tags of the file, do it now and also do not hesitate to change the file name(s). You can do that with your favorite tagger for both file formats (MP3 or MP4). For the MP4 file it is very advantageous to rename the file extension from .mp4 to .m4a as that is the only possibility to play the file in iTunes or on an iPod (and these are very important players, right?).
Congratulations, that's it. Easy and simple, isn't it?!
Now upload the finalized file(s), they are of decent to good quality - fully sufficient for normal uploads
However, if you want to deliver simply the best then read on and learn about optimized releases!
FOR ADVANCED USERS, QUALITY SPECIALISTS AND RELEASE EXPERTS: OPTIMIZING RIPPED BROADCASTS
The paragraph above describes how to rip broadcasts and some other basic things. More advanced uploaders however know, that there are some other things to do to prepare a release that fulfills highest quality criteria - error-free files in perfect quality that can be played by any software and hardware player without problem. These things are described below. Note that all the procedures require either MP3 or MP4/M4A files (see above for converting AAC to MP4), raw AAC+ files cannot be handled.
Avoid clipping by applying ReplayGain (for MP3 only)
Internet radios almost always broadcast "as loud as possible", typically @96-97dB. This is way too much and results in a lot of clipping upon decoding. Proper values to avoid clipping are between 89-93dB. While it is almost unavoidable to get clipping during the original broadcast everyone can still adjust the "gain" in the ripped MP3 files in a way to avoid clipping upon playback. This makes the files better than the original broadcast. The main program for MP3 broadcasts to adjust the gain is the program MP3Gain. A special version of MP3Gain is able to edit AAC+ files as well, unfortunately this version does not work with streamed AAC+ content from internet radios. MP3Gain adjusts the Global Gain fields in MP3 files and therefore changes the MP3 files physically. That is good as this allows to adjust the gain for essentially every hardware and software MP3 player.
- Get MP3Gain first and install it.
- Then simply drag'n'drop some mp3 files on the MP3Gain window and apply the gain normalization. Choose the Target "Normal" volume (between 89.0dB and 93dB) and then press the Track Gain button. That's all. The image below shows the most relevant buttons and infos. If the gain normalization was not successful you will see it immediately after the normalization procedure (the line with the file will be displayed in red and the track clipping indication (blue box in the image below) will show a Y. Redo the track normalization in this case. MP3Gain also allows you to do some batch processing (simply drag & drop many MP3 files in the MP3Gain window and press the Track Gain button.
That's it. For MacOS and Linux users: versions for you exist as well...
Avoid clipping by applying ReplayGain (for MP4/M4a only)
In contrast to changing the 'global gain' fields in MP3 files this is not possible for streamed AAC+ content in MP4/M4A containers. The only available method is to add 'ReplayGain' tags to the MP4 files. This allows advanced software players (at the moment foobar2000 and Winamp) to apply the gain during playback of the MP4/M4A files. The only working possibility at the moment to get this done is by using the player foobar2000, newest version (>0.94) with some plugins installed. The procedure is as follows:
- Load an MP4/M4A file in foobar2000.
- Right-click on the file, a pop-up menu appears.
- Go to ReplayGain --> Scan Per-File track Gain, do it.
- A window with the scan result appears. Hit on the Update File Tags button.
Your MP4/M4A file now has the necessary ReplayGain tags to avoid clipping.
Editing/cutting MP3 files without decoding
MP3 files can easily be cut and edited with MP3DirectCut.
- Download it from the MP3DirectCut homepage and do not forget to download the MPGlib.dll as well.
- Install both.
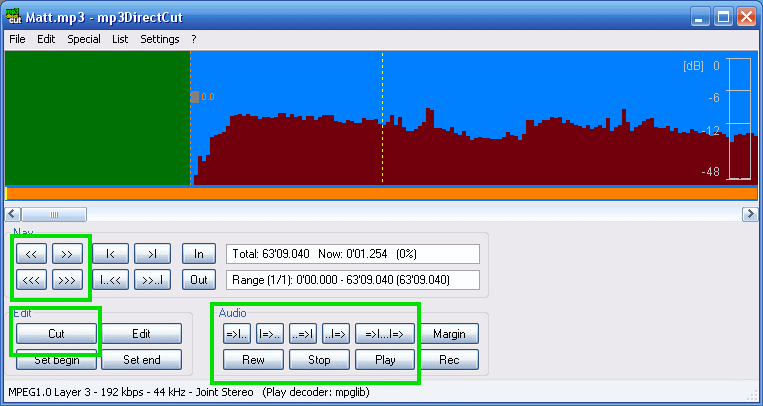
- Load your first MP3 file in MP3DirectCut and edit it. The usage of MP3DirectCut does not follow the normal Windows conventions and that means that you will have to learn using it. To help you a bit the main MP3DirectCut window is shown below. The coloured rectangles provide you with the main buttons you will need. The mouse (both the left and the right button) can be used in the stream window to define blocks you want to cut.
Again, the use of MP3DirectCut is not straightforward, you will need some trial-and-error attempts before you properly get your first MP3 file cut. Make a backup of your MP3 files first!
But, after getting the tricks you will find that MP3DirectCut is a mighty tool for editing and cutting MP3 files and you will not want to miss it!
Editing/cutting AAC+ files without decoding
The combination of the programs BeSplit (download link), WBias (download link) and Winamp usually allows to cut AAC+ files - unfortunately this most often does not work with streamed AAC+ files. You might want to try it, download the latest versions of the three programs, install BeSplit and WBias in one and the same directory and start WBias. Everything else is almost self-explaining. But again: the cutting process most probably will result in unexpected results with streamed AAC+ files so you better make backup copies of your AAC+ files first!
Special note: the above programs are unique - they do not work with MP4/M4A but with the raw AAC+ files only. Therefore, if you intend to cut AAC+ files, do it directly after ripping them and before placing them in MP4/M4A containers.
MISC
Enjoy!
